
Table of Contents
- 1 Concept
- 2 Procedure
- 2.1 Logging In
- 2.2 Using WiFi
- 2.3 Making and Receiving a Call
- 2.3.1 MDialing a Call
- 2.3.2 Receiving a Call
- 2.4 Active Call
- 3 Contacts
- 3.1 Switching Contacts View
- 3.2 Searching Contacts
- 3.3 Adding Contacts
- 3.4 Contact View (Edit/Dial)
- 4 Voicemail
- Call History
- 4.1 Switching Call History Views
- 4.2 Side Navigation
- 5 User Profile
- 5.1 Answering Rules
- 5.2 Greetings
- 5.3 About
- 5.4 Submit Bug Report
- 5.5 Logout
- 5.6 Known Issues
- 5.7 Planned Future Improvements
The Homepage consist of your application selection at the top and widgets that display information regarding the domains activity as seen in figure 2.3 below.
What are the features contained in SNAPmobile Android?
Concept
SNAPmobile Android is a softphone with Portal capabilities including visual voicemail, call history, contacts, greetings, and answering rules. The key features are:
- SIP softphone
- Contact Management
- Visual Voicemail
- Answering Rules Management
- Call History
- Presence
- Extension Dialing
- Call Transfer
- Call Recording
- Switch Call to a New Device
Procedure
Logging In
- When launching SNAPmobile for the first time, the user will be presented with the login screen.
- Enter the Host/ID for your servers, the user’s login name (e.g. ext@domain), and the password used to access voicemail and the portal, then click Login.
- After the initial login, this data will be stored and not be requested again unless the user logs out. If user logs out then only password is requested again, Host and Login are prefilled unless the app is exited.


Using WiFi
- If WiFi on the phone is disabled when SNAPmobile is launched a prompt will be presented asking the user if they would like to enable WiFi.
- Enabling WiFi is generally preferred as long as the underlying connection is suitable for VoIP. (Take into consideration bandwidth, packet loss, jitter, latency, etc.)
- Cellular networks will generally work well but will vary in network quality.
 Making and Receiving a Call
 Making and Receiving a Call
- From the Contacts, Voicemail, or Call History view a Dialpad icon will be displayed in the lower right corner.
- Click the icon to launch the phone dialer view.
Dialing a Call
 Dialing a Call
- From the phone dialer view, the user can dial both internal extensions and external phone numbers.
- When dialing, the top of the dial window will show autocomplete suggestions of other users (coworkers) with numbers that match the current dialing pattern.
- When dialing is complete, press the green dial icon to begin the call.
 dial
dial
 dial
dialReceiving a Call
- When there is an incoming call the caller ID along with answer and reject buttons will be displayed.
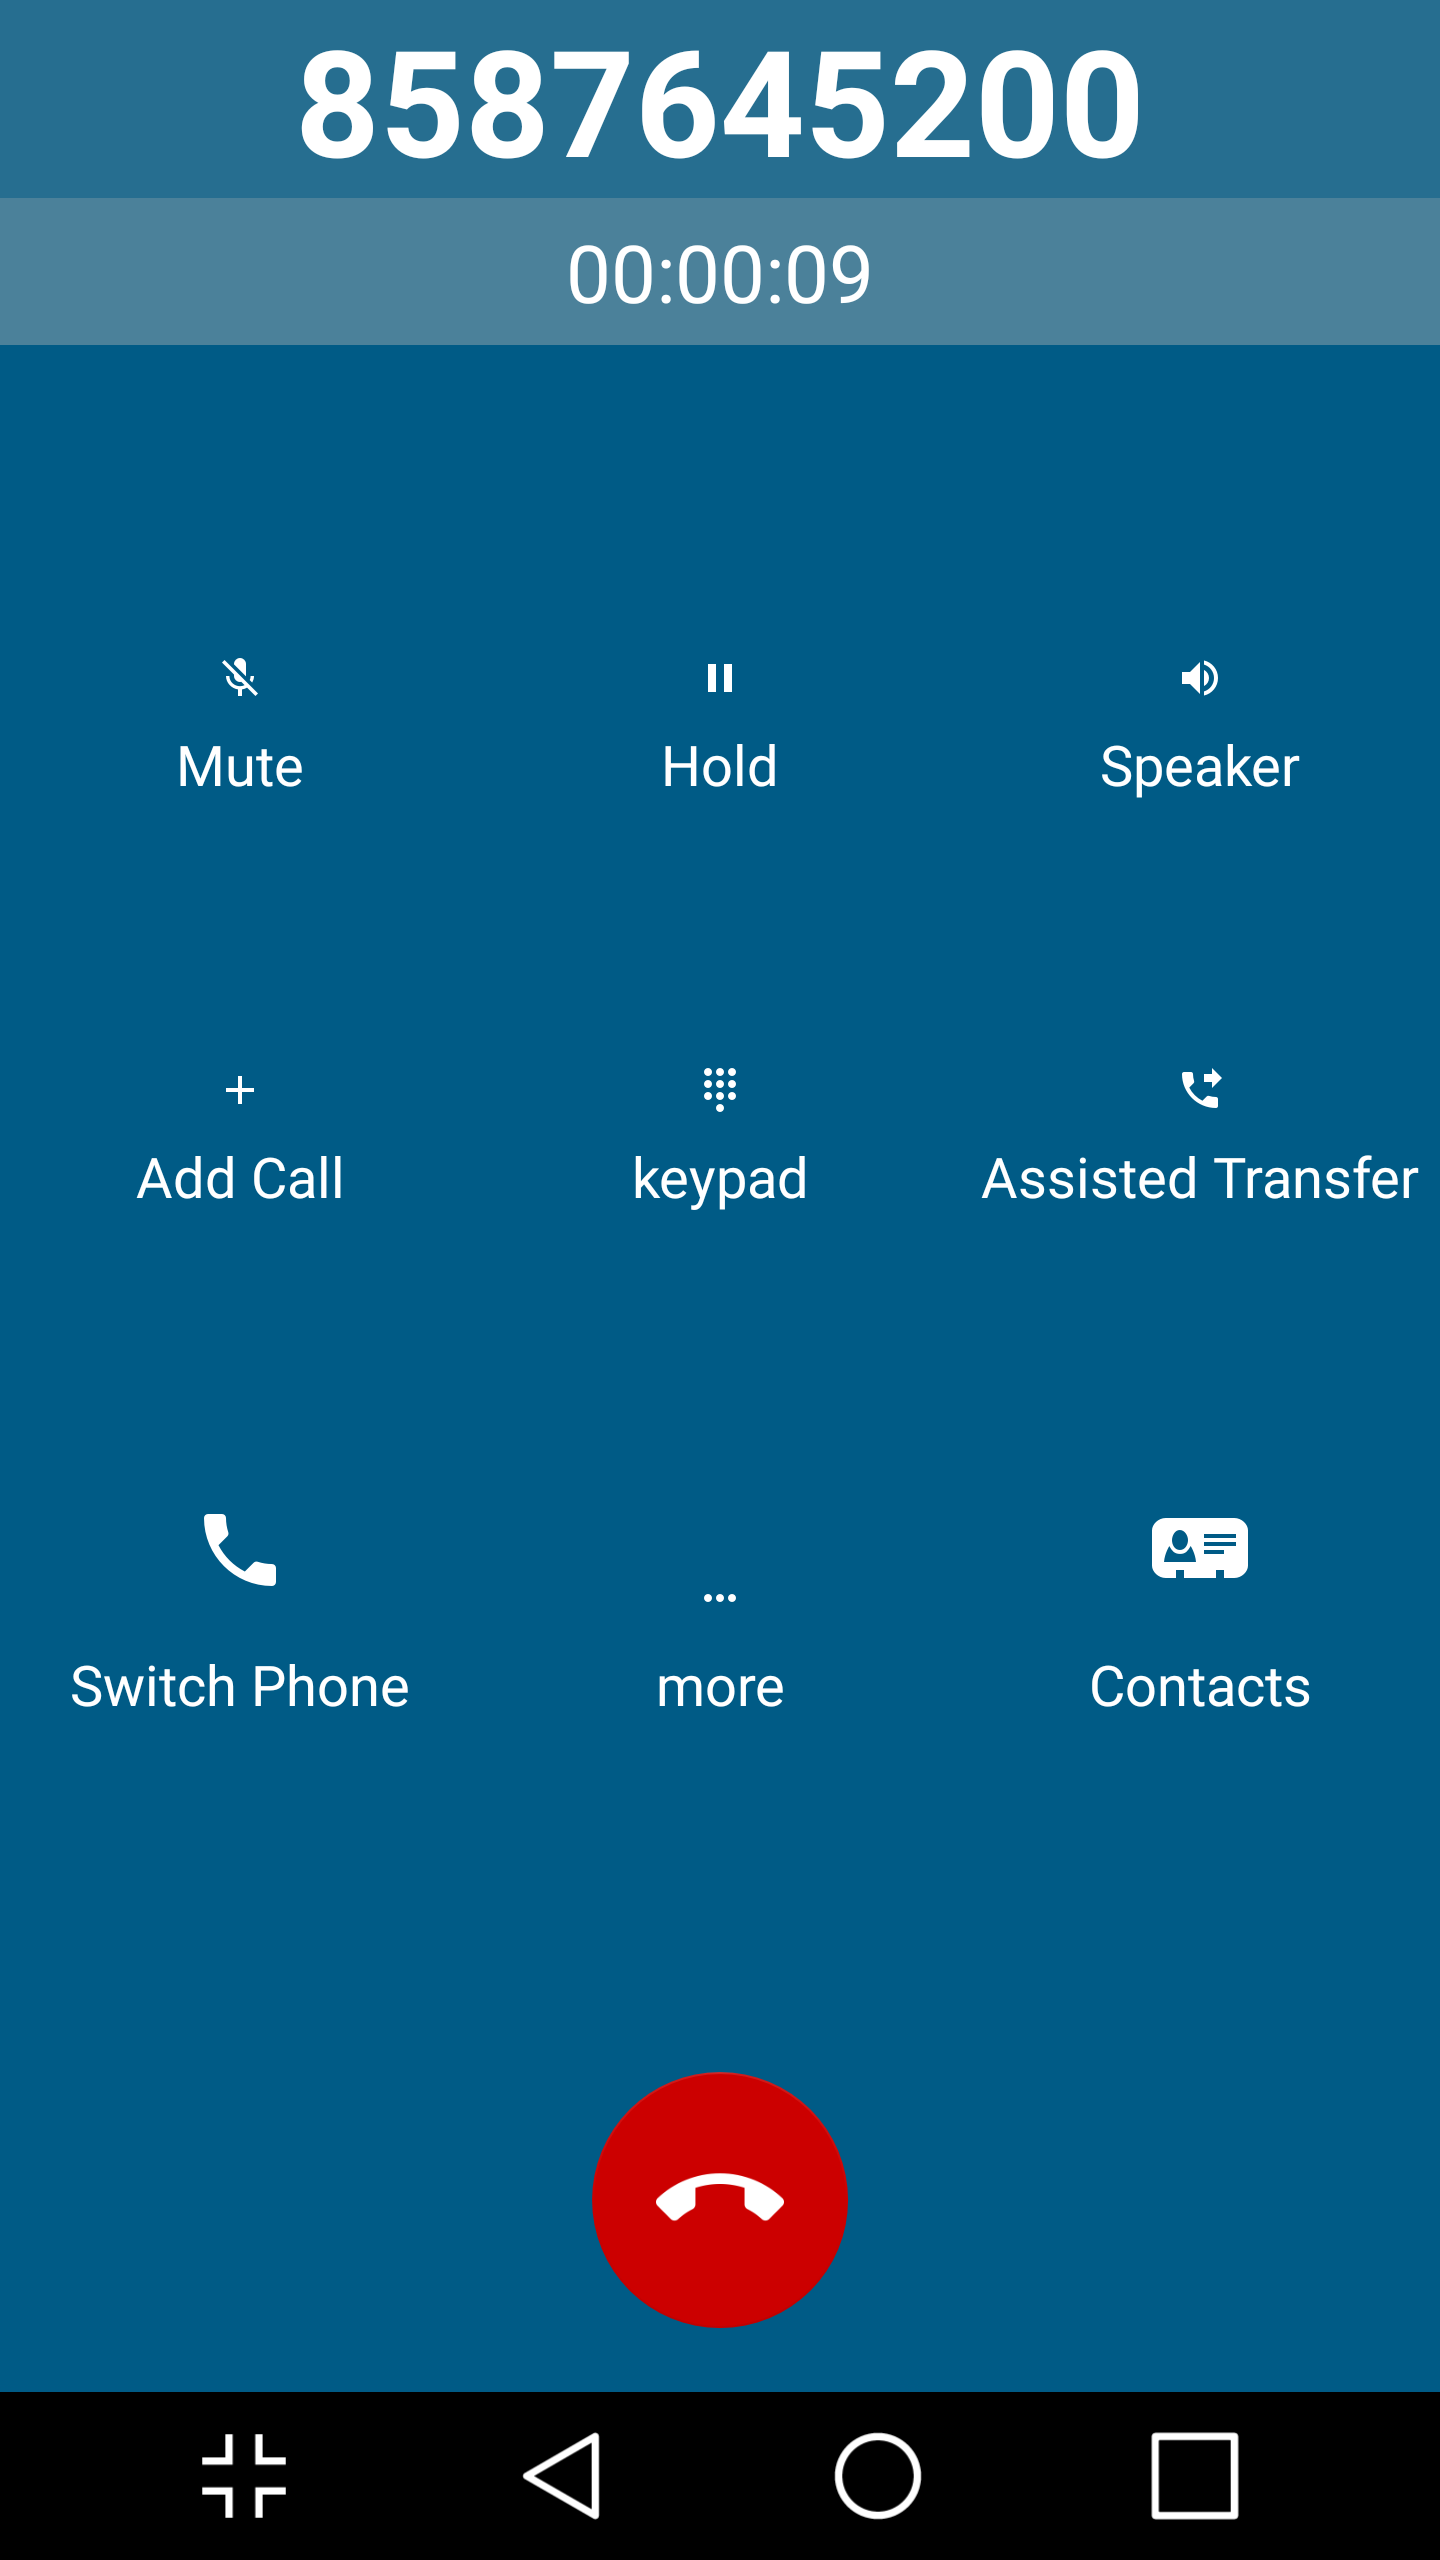
Active Call
 Active Call
- When there is an active call in progress;the status, dialed number, and call timer will be displayed at the top of the screen along with the following call functions:
- Mute – This disables the microphone.
- Hold – This places the other party on hold.
- Speaker – This enables the speakerphone.
- Add Call – This enables the user to create a second call that is separate from the first call. Once the second call is established the calls can be merged into a three-way conference or kept separate with the ability to swap between calls.
- Dial Pad – This enables the entering of digits when dialing into an auto attendant/IVR.
- Assisted Transfer – This transfers the call with an announcement to the destination.
- Switch Phone – This moves the call to other devices owned by the same user or to the cellular number.
- More – This launches a new window with options to Hide call, return to the main view of contacts/history/voicemail or to Start Recording for on-demand call recording; if enabled for the user.
- Contacts – This brings up the contacts view enabling the user to make a second call, and then optionally merge (conference) or transfer the call.

Contacts
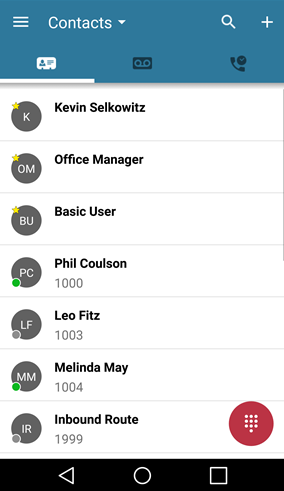
- The Contacts view shows coworkers as well as contacts from the phone.
- The coworker contacts are synced from the contacts found in the online Portal.
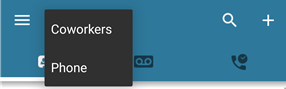
Switching Contacts View
- By default, the view will show coworkers. To toggle between coworkers and phone contacts.
- Clicking on the Contacts pulldown in the header, allows the user to select which set of contacts to view.
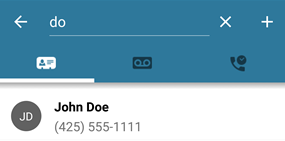
Searching Contacts
- To filter/search contacts, click the magnifying glass in the upper right, then type in the name to filter.
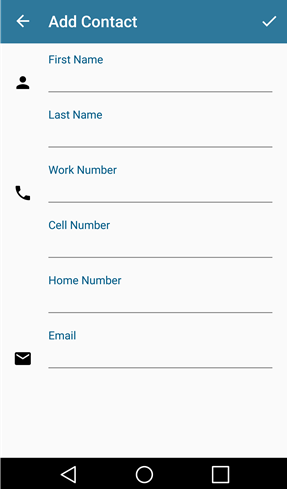
Adding Contacts
- Clicking the plus icon in the upper right brings up the Add contact view.
- Complete the fields to add a contact then click the check button in the upper right to save the contact to coworkers.
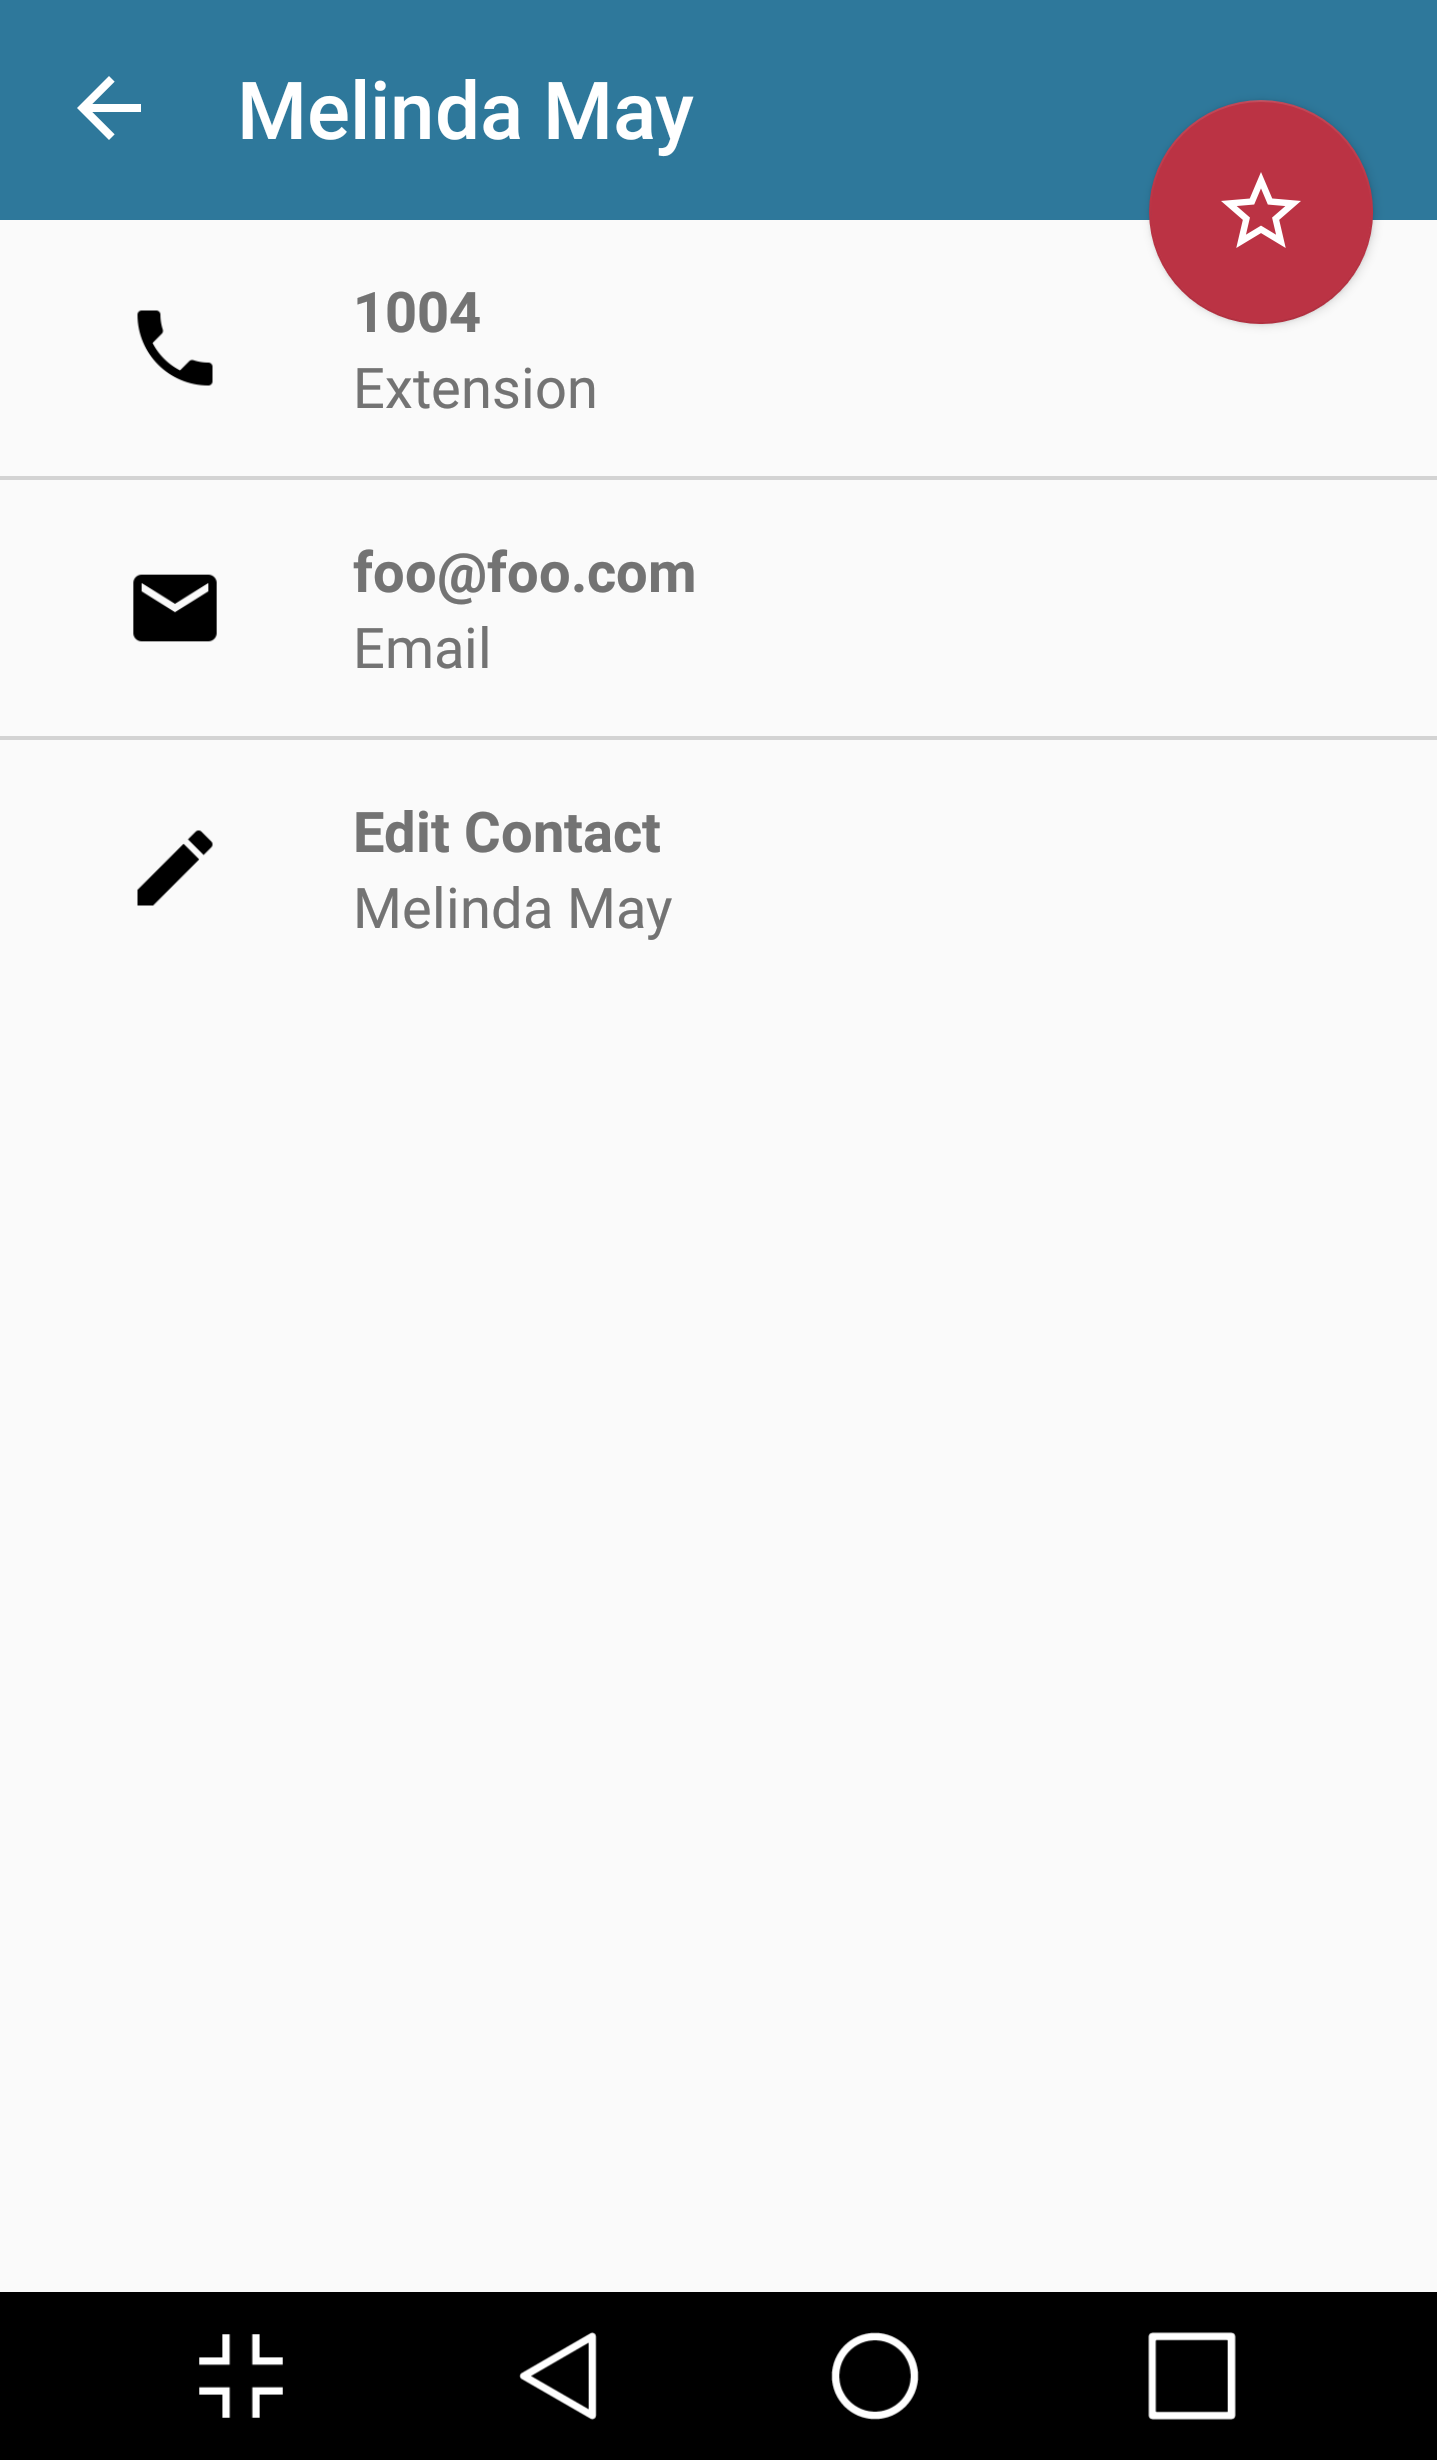
Contact View (Edit/Dial)
- When viewing the list of contacts, the user can click on a contact to view details.
- The contact’s extension/phone number(s) and email addresses (if available) will be displayed.
- Click the star icon to toggle the favorites status, when the star is all white the contact is selected as a favorite. Updated screen shot attached.
- Clicking on the extension/phone number in Contacts directly calls the number.
- Clicking on the email address will launch your email application with a new message to that address.

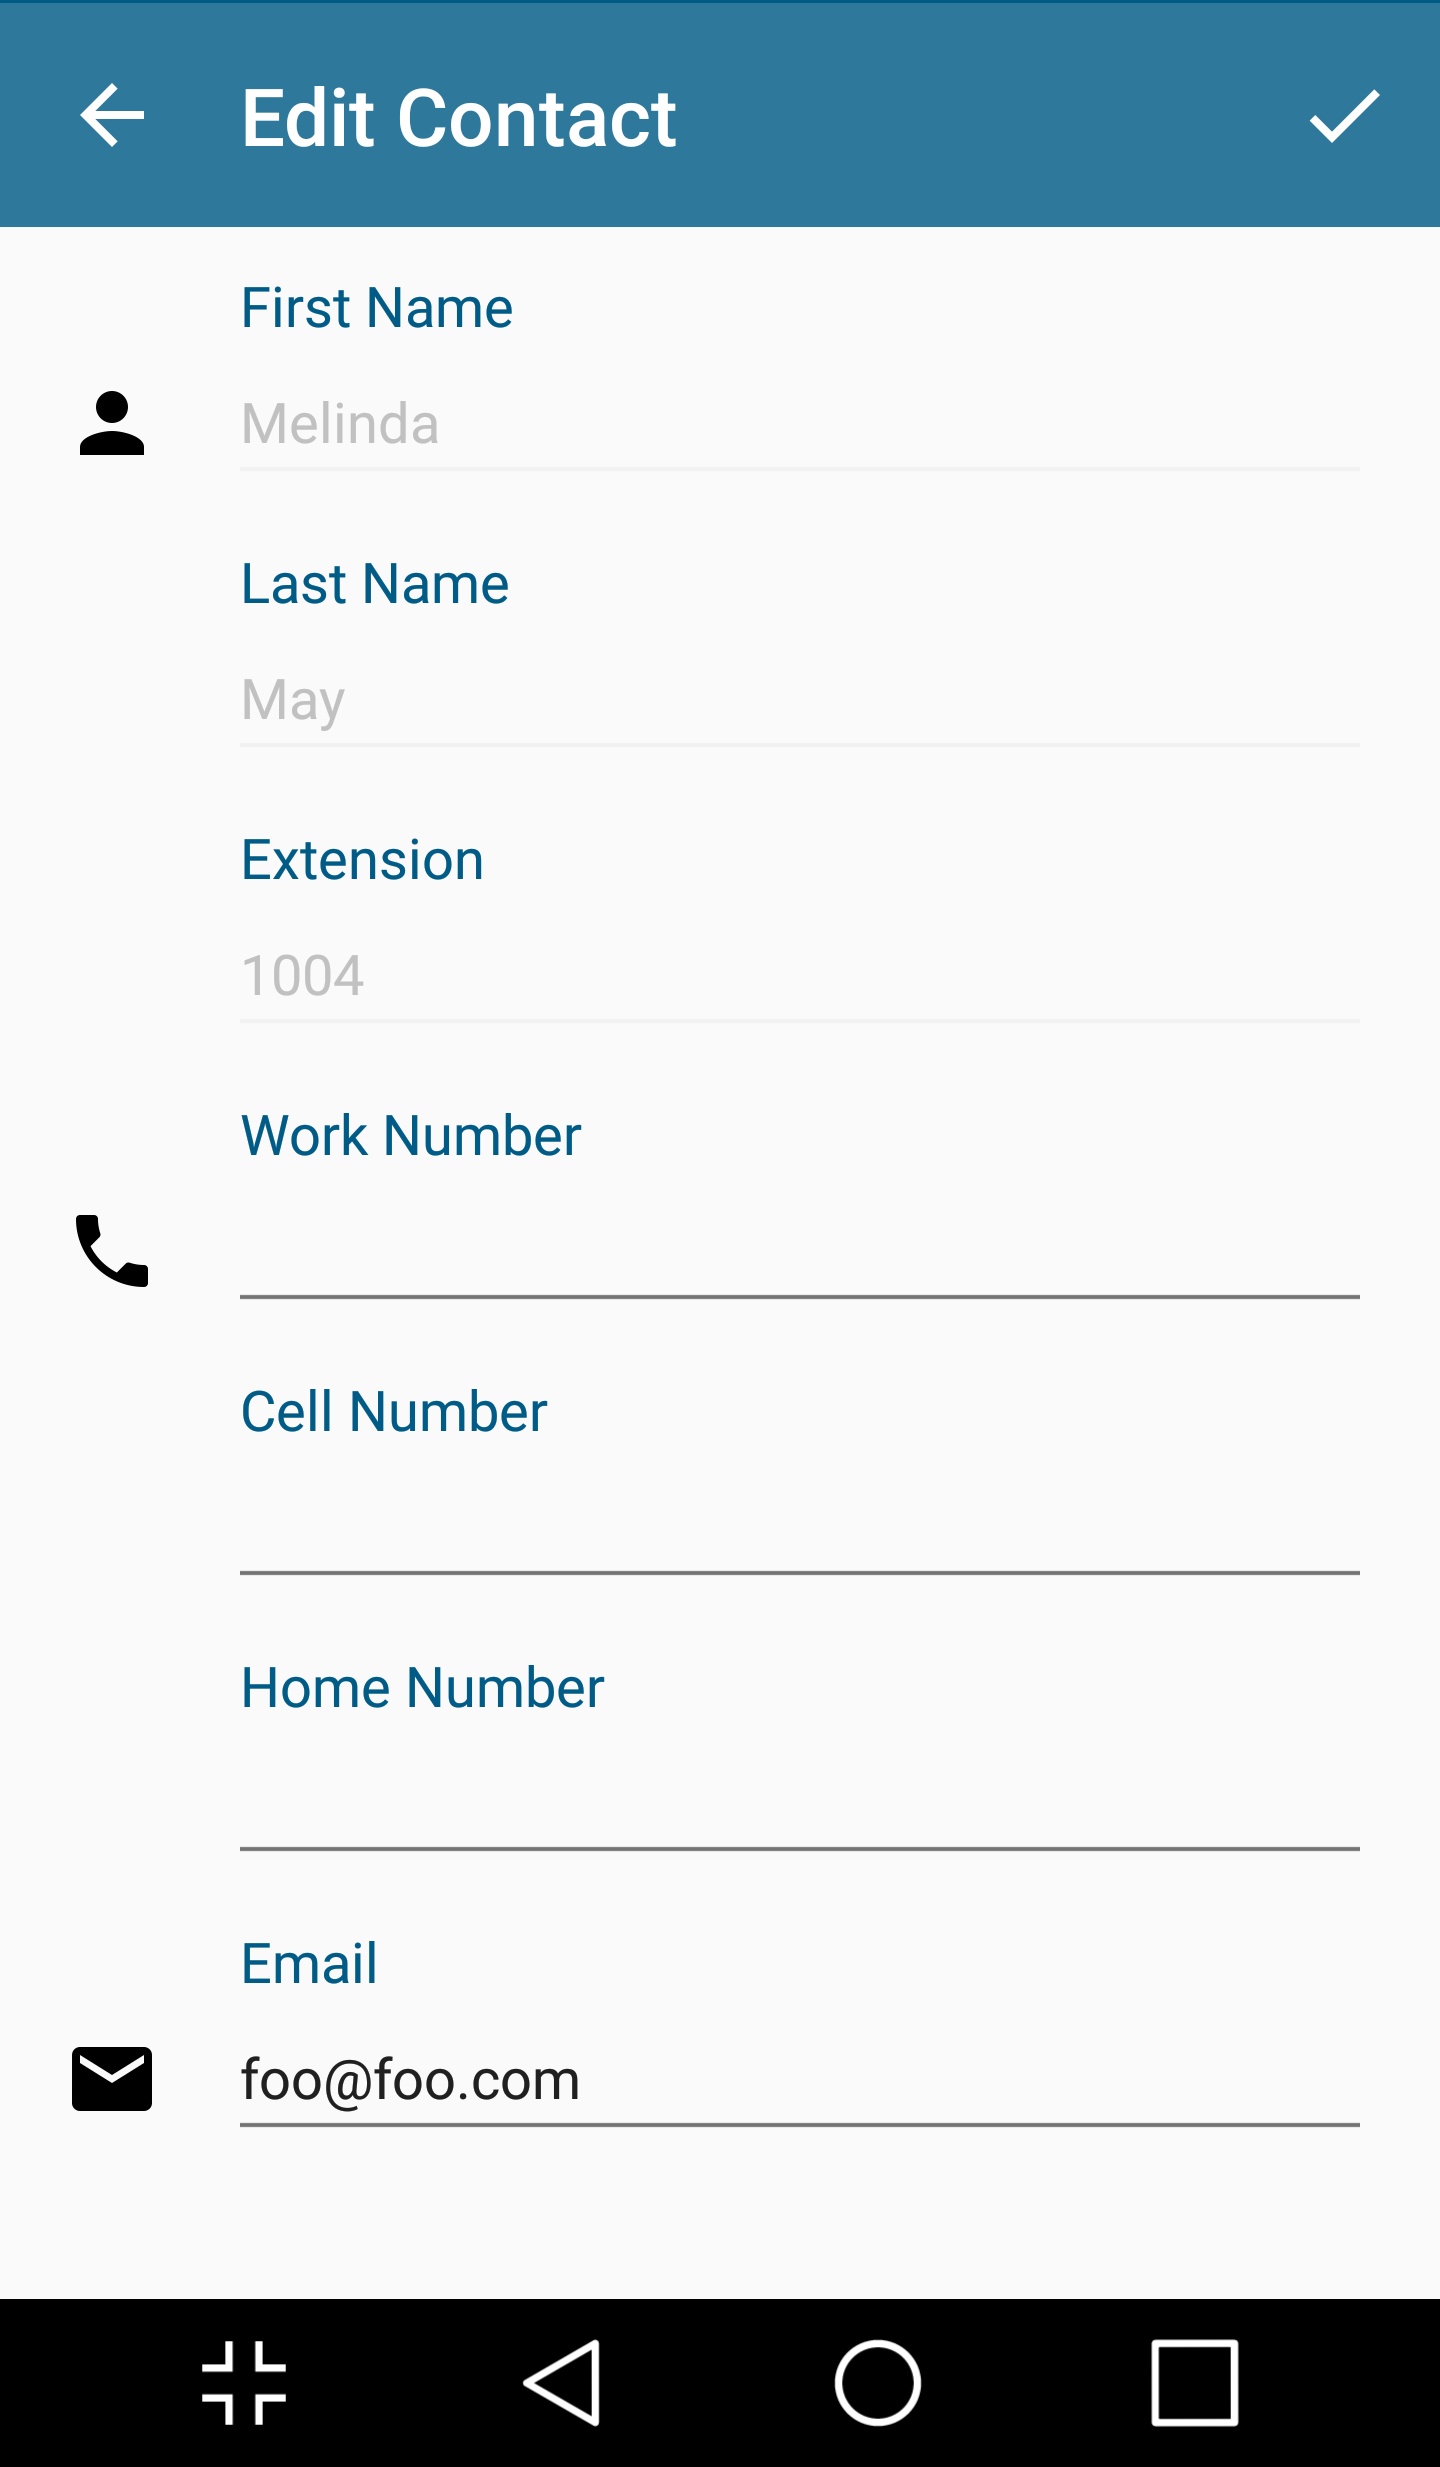
- Edit contacts will allow you to edit contacts that are found in the online Portal only and not the contacts that are stored in the Android phone’s contacts.

Voicemail
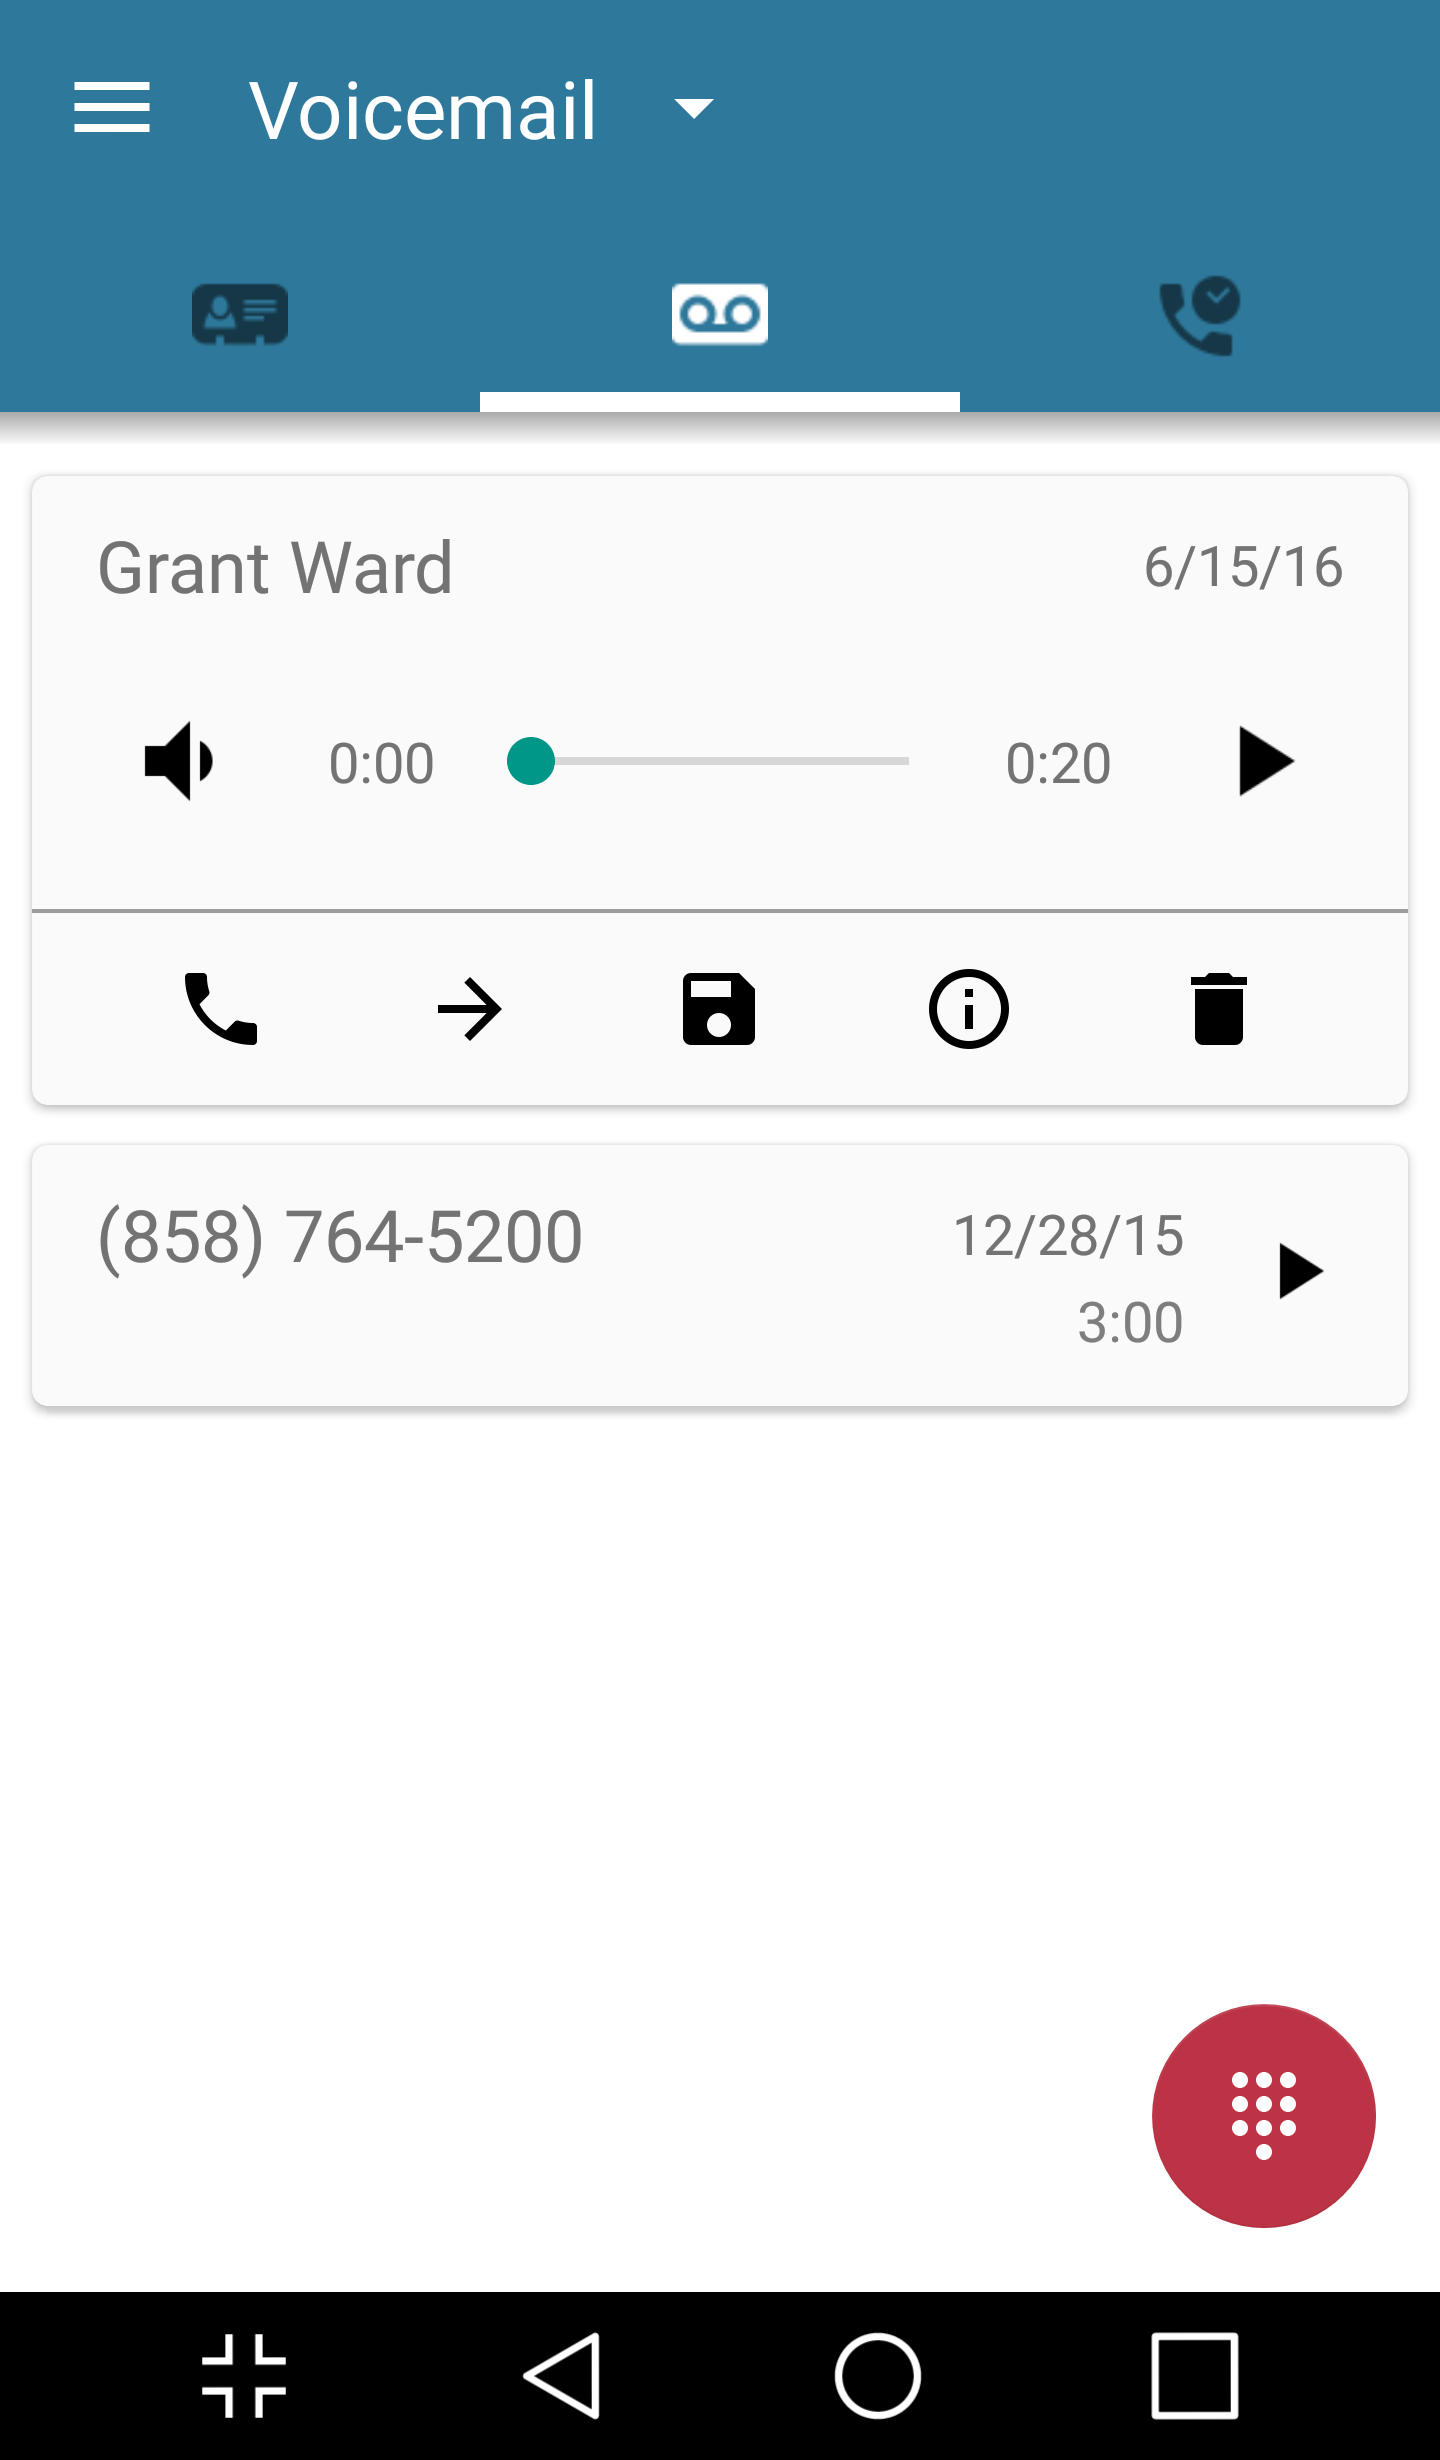
- The Voicemail view shows the user’s voicemail box
- Users can click the play button to listen to the message or click elsewhere on the message to display additional options.
- Speaker – This enables/disables speakerphone playback vs earpiece.
- Message progress bar – This shows the current place in the message. The user can drag and drop the nub or click on the bar to jump to another part of the message.
- Play/Pause Toggle – Clicking play begins playback. When a message is playing, this becomes a pause button.
- Call – This calls back the number; if caller ID is known.
- Forward – This allows the current message to be forwarded another user.
- Save – This moves the message to saved messages.
- Info – This displays a screen of additional message details and actions.
- Delete – This moves the message to trash.

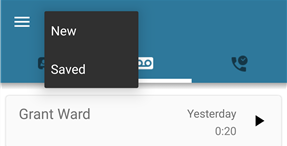
Switching Mailbox Views
- Clicking on the Voicemail pulldown in the header allows the user to select New or Saved messages.
Call History
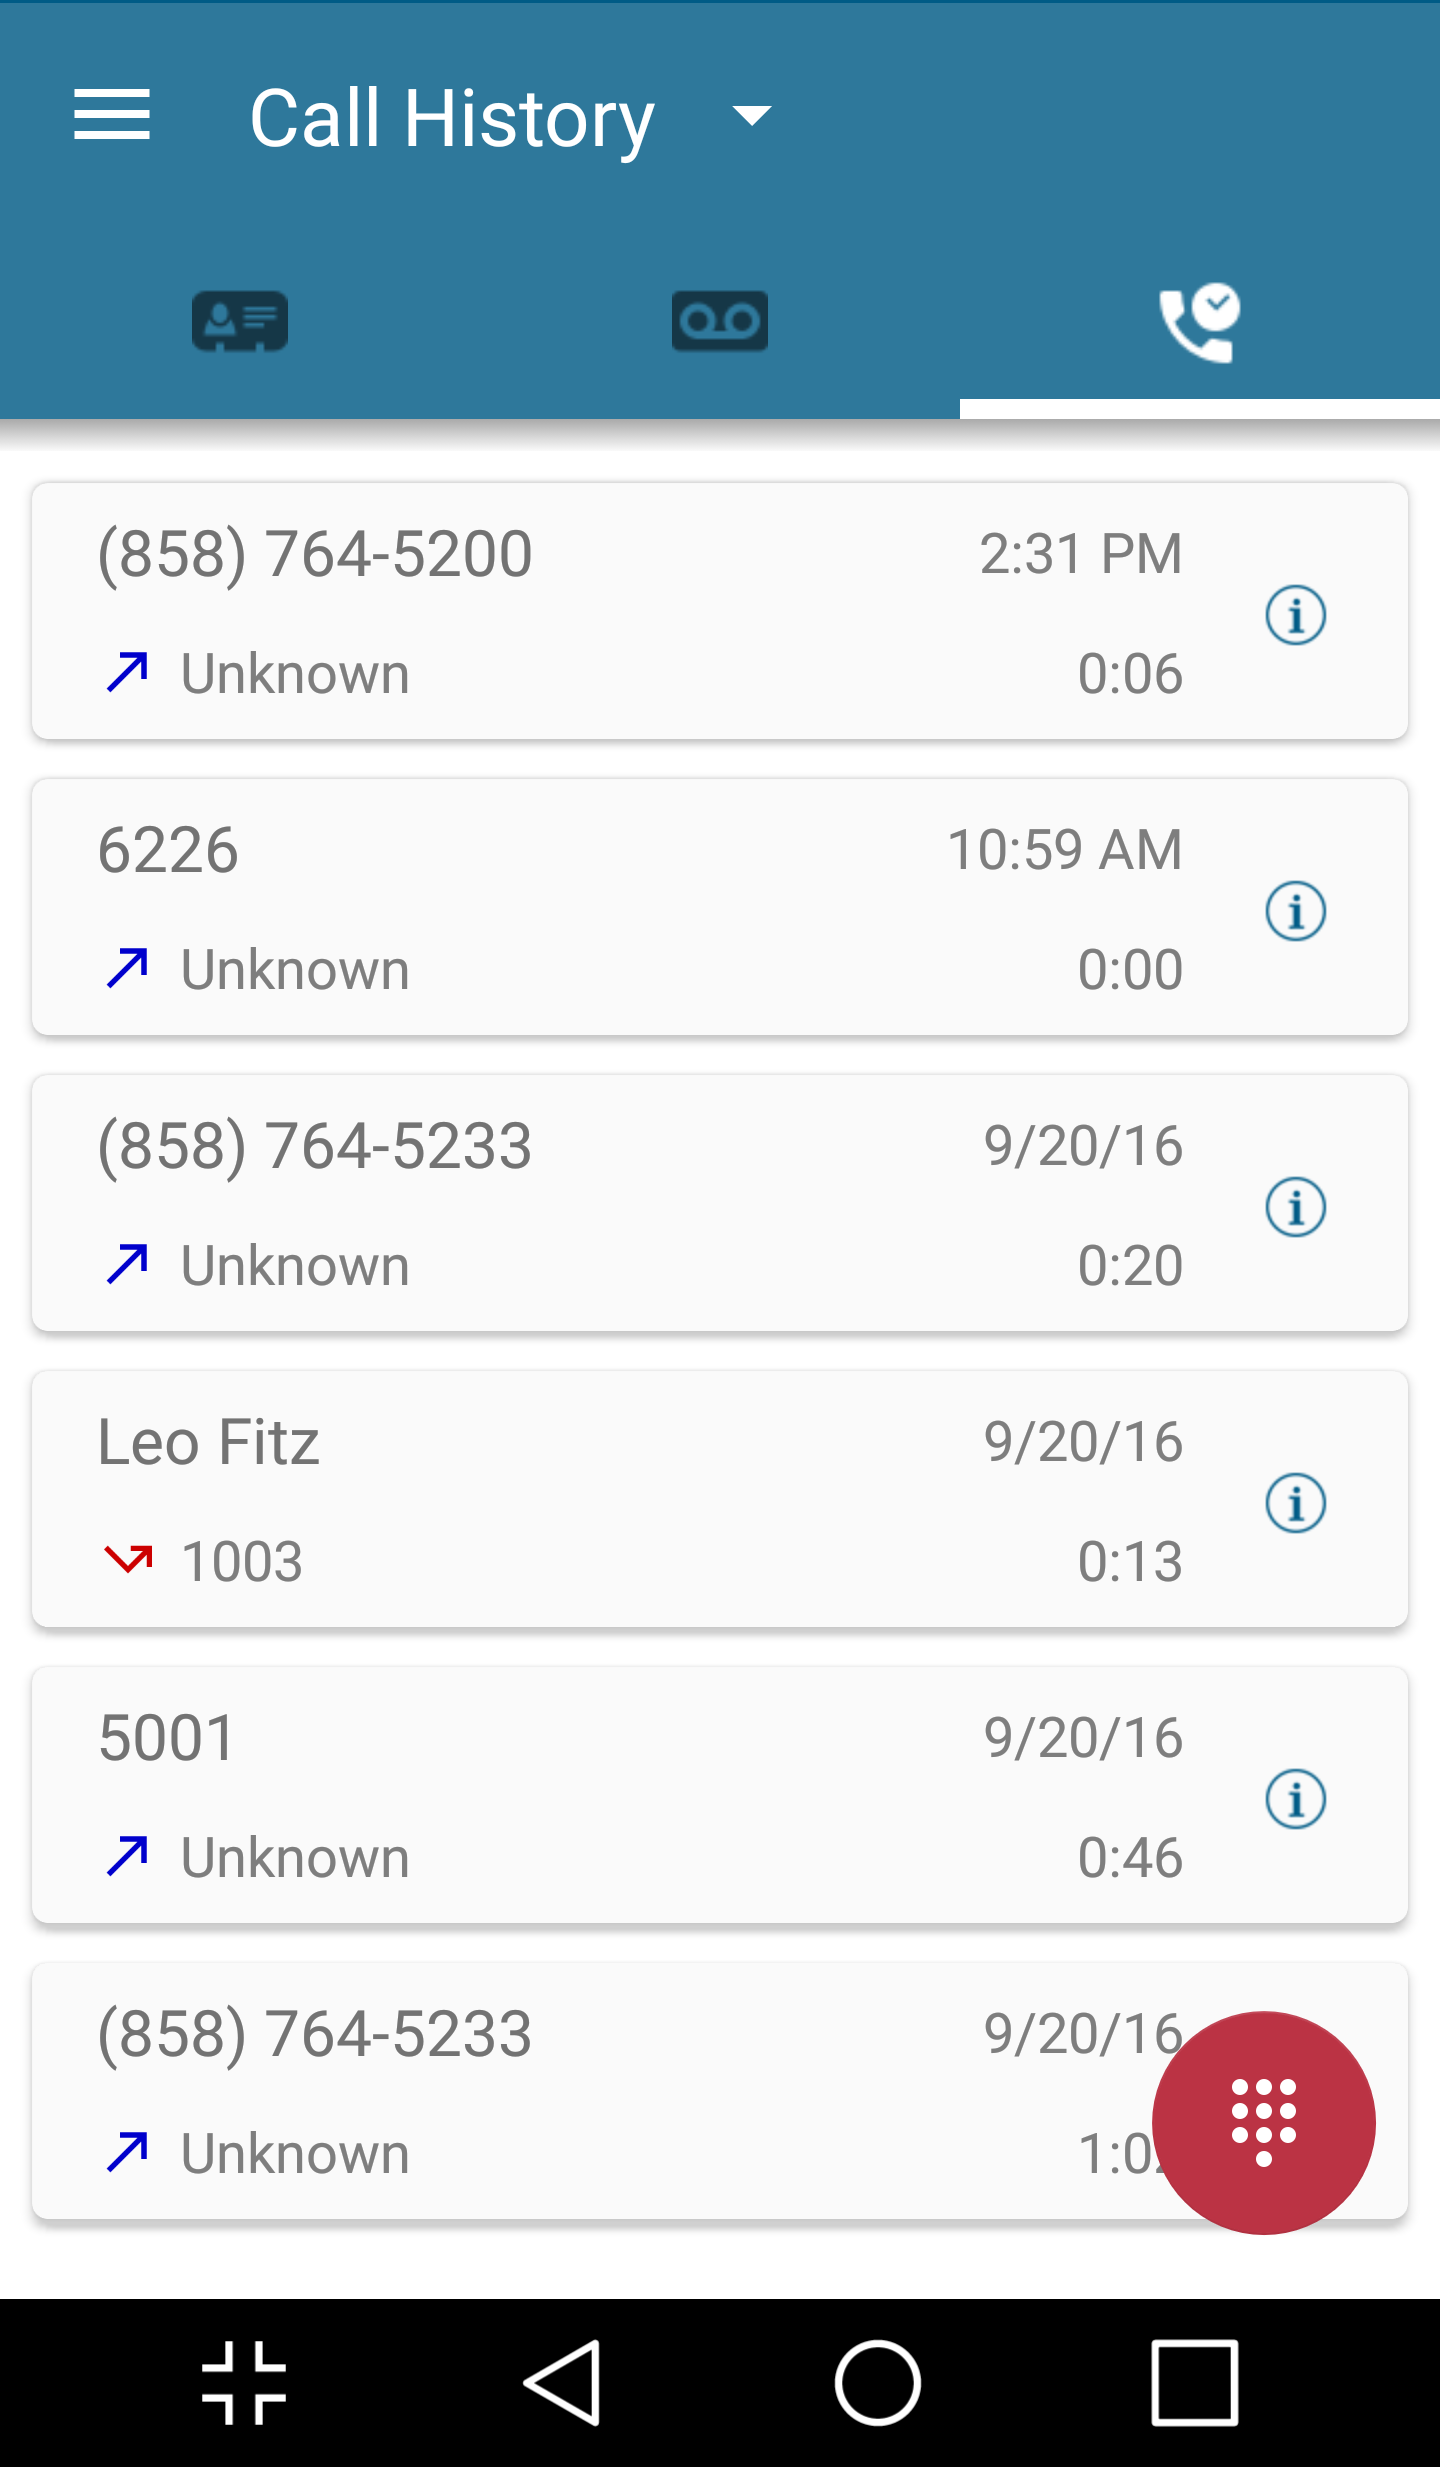
- The Call History view displays the user’s call history including inbound, outbound, and missed calls.
- The records displayed will show caller ID if available, call direction (inbound, outbound, or missed), call time, and call duration.
- Clicking the info icon displays additional details.
- Clicking elsewhere on the call history record will return the call.

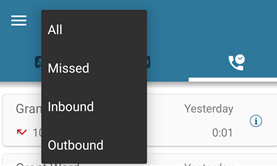
Switching Call History Views
- Clicking on the Call History pulldown in the header allows the user to select a view of All, Missed, Inbound, or Outbound Call History.
Side Navigation
The Side Navigation bar can be opened by pressing the Menu icon (three horizontal lines) in the upper left corner or by swiping right from the left-hand side of the screen. The Side Navigation bar has the following functions:
- User Profile
- Answering Rules
- Greetings
- Settings
- About
- Submit Bug Report
- Logout
User Profile
Clicking on the name of the user at the top left of the Side Navigation launches the profile view. From here you can see/edit the following content:
- First and Last name (editable)
- Login Name (view only)
- Cell Number (if the device has a cell number – view only)
- Email (editable)
Answering Rules
Clicking on Answering Rules displays a list of the user’s answering rules. To re-prioritize the rules, grab the grip at the right to reorder the answering rules, the change will be automatically saved.
Greetings
Clicking on Greetings allows the user to manage voicemail greetings. The following functions are available:
- Record a new greeting
- Listen to existing greetings
- Select the active greeting
- Delete a greeting
Settings
Clicking on Settings allows for the customization of the following SNAPmobile functions.
- Mobile Number – This displays the device’s mobile number, if applicable.
- Automatic Bug Reporting – This is toggled on by default and will automatically report certain kinds bugs.
- Allow Vibration – This is toggled on by default and will enable vibration.
- Format numbers by geolocation – This is toggled off by default; when toggled on the app will attempt to display phone numbers formatted for the region where the phone is physically located.
- Use software echo canceling – This is toggled off by default and allows SNAPmobile to attempt to use the device’s hardware echo canceling functionality. If a regular echo is experienced the this should be toggled on to enable the software echo canceller.
- Automatically Dim Screen During Calls – This is toggled on by default and will dim the screen with an active call when the phone is placed near the user’s head to prevent accidental dialing.
About
This displays the SNAPmobile version, SDK version, and permits submission of feedback.
Submit Bug Report
This submits current application logs as well as giving the user the ability to provide additional detail on the bug.
Logout
This logs the user out of the application.
Known Issues
- The handoff from WiFi to Cellular (or vice versa) will drop an active call.
- Geo-redundancy is not enabled.
Planned Future Improvements
- Dialing an emergency number (911) via the cellular network rather than through the SIP client.
- Adding ringtone management functionality.
- Adding the ability to perform a blind transfer.
- Adding tablet resolution and landscape mode.
- Adding SMS and IM functionality.
What you`ll learn:
- Concept
- Procedure
- Making and Receiving a Call
- Planned Future Improvements